Frugal LANbox UPDATE
A little while ago we put together a lanbox in a case that we had bought from Homedepot for 20 measly dollars. I’ll list the changes that have been made since the first article and then well go through and show you how we did each change.
CHANGES MADE
- Removed the PCI Power Supply and put in a SAFER Power supply.
- Added some nice little LED’s and POWER Switches.
- Cut holes for the CDrom and DVD drives.
- Added a Bracket to hold the Hard Drive.
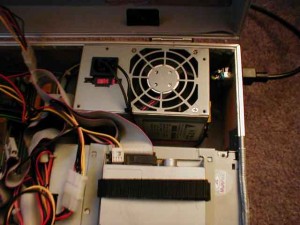
If you checked out the pci power supply you’ll understand what I mean when I say SAFER. After zapping myself numerous times, and other parts in the lanbox, I knew this thing was unsafe and had to be discarded with extreme prejudice. I think all that zapping has affected my short term memory so I tend to repeat myself. I knew this thing was unsafe and had to be discarded with extreme prejudice. I think all that zapping has affected my short term memory so I tend to repeat myself easily. hehe.. yes i know im a dork. So we found a smaller power supply to put in. We also ran wire extensions so we could run a plug connector directly to the side of the lanbox. This helped with saving space for our cd drives. Also it looks spiffy when you show up to a fragfest. Of course with a small power supply like this one your gonna lose some wattage, ours pumps out sad 185w, but at least its enough to run the machine.
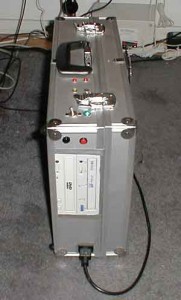
Next were gonna look at the LED’s and Power Switches. This stuff is so easy to do and it adds that.. awestruck, flabherghasted look to your pc. Plus chix dig LED’s man. Well thats what the guy at RadioShack told me anyway. All we did here was drill some small holes and connect up some lights to the power supply and then we put in a power switch which you can see all the way on the right. One of the LED’s is actually hooked up to where the hard drive led connects to the motherboard, so we can see when she croaks and when shes still thinkin. The other LED’s are for.. yep you guessed it.. the ladies.

Onto the CDdrives. These were a little harder because we had to cut some pretty large holes in the side of the box and we wanted it to look nice on the outside.. It looks pretty good don’t it. We wanted to also make the drive easily accessible if they needed to be removed so what my bro did was take an old drive bay from a Packard Bell case we trashed.. with the utmost prejudice, and screwed the two drives in there and then velcroed the sucker down to the case. It all works pretty good and they dont heat up that bad either. We also velcroed a old floppy drive to the bay. But what you have to do to use the floppy drive is open up the lanbox. This is okay though cause we dont use the floppy that much.

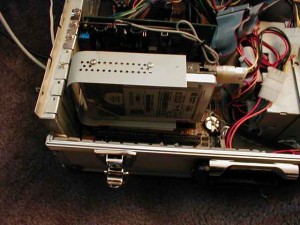
Last but not least the Hard Drive bracket. Before we made this bracket the hard drive used to just flop around inside the case.. so we sent away for a new one cause it was still under warranty.. hehe. I always knew that those little things you rip out of new computer cases would come in handy some day… you know the little flat peices of metal with holes that block the cd drive bays. Bastard things cut me enough times. So.. take your little flat peices of metal and screw them onto the harddrive, then take an old slot insert and bolt the flat peices of metal to it. Like in the picture below. This actually works really well.. we do lose some PCI slots but thats ok for now because soon the ISA slots well be outdated, so we can cover up those instead. Oh wait did I say soon theyll be outdated.. I meant.. we moved the hard drive over the ISA slots instead.

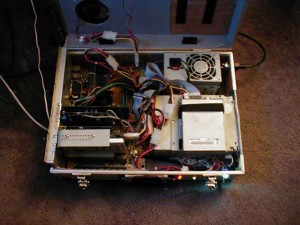
Here is a final pic for ya of the inside of the lanbox.

And thats it for our update to the Frugal LANbox, I hope you enjoyed it and these ideas can help you create your own .. err.. creation.


Leave a Reply